DIY Dryer Vent Cleaning — Complete Step-by-Step Guide
Most homeowners can clean a residential dryer vent themselves for $20–35 in supplies and about 45–60 minutes of work. Here's the complete procedure — from the dryer connection all the way to the exterior cap — including what to look for, what to do if you find it, and how to verify the job is complete.
Tools and Supplies You Need
| Item | What to Look For | Approx. Cost |
|---|---|---|
| Dryer vent cleaning kit | Flexible rod sections (4–6 ft each, connect together), lint brush head sized for 4-inch duct, drill attachment optional. Brands: Deflecto, Holikme, LintEater. | $20–35 |
| Vacuum with hose | Shop vac preferred; household canister vacuum with a long hose works too. You need enough reach to get into the duct inlet from inside. | Own it or borrow |
| Flashlight or phone camera | For inspecting the interior of the duct at the wall stub-out and at the cap. | Own it |
| Metallic foil tape | For resealing the transition duct connection if you disconnect it. Standard gray duct tape is not suitable — it fails at dryer exhaust temperatures. | $8–12/roll |
| Work gloves | Lint is dusty and metal duct edges are sharp. | Own it |
| Dust mask (N95 or better) | Lint dust is a respiratory irritant. | $1–3 |
Before You Start: Three Things to Check
Before pulling the dryer out and disassembling the transition duct, take 5 minutes to gather information that will make the cleaning go faster and help you know when you're done.
1. Know your approximate duct length. Count sections of visible rigid duct if any is exposed. This tells you how many rod sections to connect and how deep to push the brush. If you haven't verified your equivalent length recently, use the Equivalent Length Calculator.
2. Note the cap location outside. Step outside and locate the termination cap before you start. You'll need to check it during and after cleaning. Note whether the cap is easy to reach — some caps are high up or around a corner that's difficult to access.
3. Check the cap condition. With the dryer off, look at the cap. Does the damper close fully? Is there visible lint buildup on the cap surface? A cap clogged with lint external buildup sometimes needs to be removed and cleaned separately — this can be done while you're already outside checking the cap.
Step-by-Step Procedure
Unplug the dryer (or turn off the gas supply)
For electric dryers: unplug the power cord. For gas dryers: turn the dryer's gas shutoff valve to the closed position — this is the valve on the gas supply line directly behind the dryer. Do not skip this step. You will be disconnecting ductwork and moving the dryer.
Pull the dryer away from the wall
Most dryers have leveling feet with rubber pads — they'll slide on smooth floors. On carpet, use a towel or piece of cardboard to protect the floor and reduce friction. Pull straight out, 18–24 inches. Be careful not to pull the transition flex duct taut — it can disconnect or kink.
Disconnect the transition flex duct
The transition flex is the short semi-rigid or flexible section connecting the dryer's exhaust outlet to the wall stub-out. It's typically secured with a clamp or slip-fit collar at each end. Loosen or unclip the connection at the wall stub-out first, then at the dryer outlet. Set the transition duct aside — you'll clean it separately.
Vacuum the dryer's exhaust outlet
With the transition duct disconnected, use the vacuum to clean the dryer's exhaust outlet — the 4-inch port on the back of the dryer. Reach in as far as the vacuum hose allows. This section accumulates lint from the last few inches before the duct connection and is often missed in cleanings that only address the duct run.
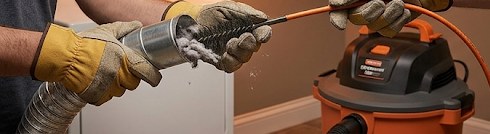
Clean the transition flex duct
Take the disconnected flex section and bring it outside or to a large trash bag. If it's semi-rigid aluminum flex, extend it fully and run the brush through it. Follow with the vacuum. If it's visibly compacted with lint or is the prohibited foil accordion type, replace it rather than cleaning it — a new compliant semi-rigid flex transition costs $15–25. Inspect the interior: a thin lint coating is normal; heavy buildup (more than 1/4 inch thick) or any visible damage means replacement.
Insert the cleaning rod into the wall stub-out
Connect 2–3 rod sections together (you can add more as needed). Attach the brush head. Insert the assembled rod into the wall stub-out — the 4-inch duct opening in the wall — and push it inward while rotating it. A slow, steady rotation ensures the brush contacts the full duct circumference. Add rod sections as you go deeper. Keep the vacuum running at the stub-out entrance to catch lint as it emerges.
Work from both ends
Once you've pushed the rod as far as it will go (you'll feel it reach the cap or an elbow), withdraw it slowly while continuing to rotate. Then go outside and — if you can safely access the cap — remove the cap and repeat the rod insertion from the exterior end toward the interior. Working from both ends dislodges lint that the single-direction pass left attached. Hold the vacuum at the cap end while a helper pushes the rod from inside.
Clean and inspect the exterior cap
Remove the cap (usually 2–4 screws). Inspect the damper: is it intact, does it swing freely, is there heavy lint buildup on the interior surface? Clean the cap with a stiff brush or wipe. Inspect the damper pivot — plastic pivots can crack and fail. If the damper is stuck, broken, or the cap has a screen, replace the cap now while you have it in hand. Reinstall the cap and seal around the flange perimeter with exterior silicone if the old caulk is cracked or absent.
Reconnect everything and verify
Reconnect the transition flex duct to the wall stub-out and to the dryer outlet. Seal the wall stub-out connection with metallic foil tape (wrap 2–3 times around the joint). Push the dryer back into position, restore power or gas, and run a load of towels. Step outside during the cycle: the cap should be fully open and you should feel strong, warm, moist exhaust flow. If you feel weak flow, there's still a restriction — investigate further before using the dryer normally.
What to Do If You Find Problems During Cleaning
A DIY cleaning sometimes reveals issues beyond lint accumulation. Here's what to do with the most common findings:
- Foil accordion duct (prohibited material): Replace it entirely. Do not clean and reinstall. See Prohibited Materials.
- Disconnected duct section inside the wall: This is beyond DIY scope. Hire a professional with a camera to locate the break and determine the repair approach. See Duct Disconnected in Wall.
- Heavy condensation staining inside the duct: Indicates chronic moisture — possible insulation deficiency in a cold climate or a duct path issue. See Condensation in Duct.
- Extremely dense, compacted lint (more than 1 inch thick): Consumer rod kits may not clear compacted lint effectively. Call a professional with rotary brush equipment and a high-power vacuum. Attempting to push through a very dense blockage with a consumer kit can pack the lint tighter.
Keeping a Cleaning Log
Recording each cleaning with the date, method (DIY or professional), condition found, and any actions taken gives you a history that helps calibrate your cleaning interval and provides documentation for resale. The Maintenance Checklist PDF includes a cleaning log section you can print and store with your home maintenance records.
Holikme 30 Feet Dryer Vent Cleaner Kit
Flexible nylon rod sections extend up to 30 feet, covers the full IRC-allowed duct length. Includes a 4-inch brush head and drill attachment for faster cleaning. Works with or without a power drill — the most widely purchased dryer vent cleaning kit currently available.
🛒 View on Amazon →As an Amazon Associate we earn from qualifying purchases. This does not affect our editorial content.
DIY Cleaning FAQ
A leaf blower attached to the exterior cap end can blow loose lint back toward the dryer — where it can be vacuumed out of the wall stub-out. This method works for light, recent lint buildup but is ineffective for compacted buildup and risks pushing loose lint into the dryer's internal components if the transition is still connected. Always disconnect the dryer from the duct before using a blower, and vacuum the dryer outlet thoroughly afterward.
Verify the cap is opening fully and exhaust flow is strong — if not, there's still a restriction in the duct. If the cap is operating correctly and airflow is strong but drying time is still long, the issue may be inside the dryer itself (heating element, thermostat, or sensor). See Dryer Takes Too Long for a full diagnostic. If the cap flow seems strong but you're not confident, a professional with an airflow meter can give you an objective measurement.
Only the transition duct connection at the wall stub-out — which you disconnected during cleaning — needs to be re-taped. Interior duct joints that were not disturbed don't need attention unless they were already leaking. Use metallic foil tape (not gray fabric duct tape) for any joint you re-seal. If a joint you didn't disturb shows lint leakage staining around it during your inspection, seal it with foil tape while you have access.