Dryer Vent Through an Exterior Wall — Complete Installation Guide
A dryer vent through a wood-framed exterior wall is the most common residential installation — and despite being common, it's done wrong at least half the time based on inspection findings. This guide covers every detail: hole sizing, which stud bay to use, vapor barrier management, fire-stop, duct installation, joint sealing, and cap selection and installation.
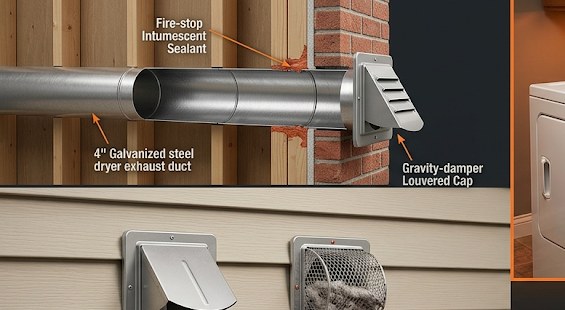
Planning the Penetration Location
The penetration location determines every downstream decision. The right location balances three factors: the shortest duct path from the dryer, the correct exterior clearances required by code, and the wall construction at the target location.
IRC Section 504.4 requires the termination cap to be at least 3 feet from any window, door, or other building opening. It also cannot terminate beneath a deck or landing where exhaust would accumulate, and cannot be positioned where lint discharge would create a nuisance or fire hazard (such as directly against wooden deck boards). For gas dryers, additional clearances from gas meter vents apply — see Gas vs. Electric Differences.
Preferred heights: most installations exit through the rim joist area (where the floor framing meets the foundation) for basement laundry, or through the wall at whatever height keeps the duct run short and level for above-grade installations. A height of 12–18 inches above grade keeps the cap off the ground but accessible for inspection and cleaning. Very low installations (under 6 inches) can become blocked by snow accumulation in northern climates.
Tools and Materials
| Item | Specification | Notes |
|---|---|---|
| Hole saw | 4-3/8 inch (for 4-inch duct with siding clearance) | Bi-metal or carbide; standard wood hole saw works for OSB, plywood, and wood siding |
| Drill | Heavy-duty corded or 18V+ cordless | A 4-3/8 hole saw through sheathing + siding requires torque — use a high-torque drill |
| Stud finder | Electronic, multi-mode | Confirm stud location and check for hidden wiring and plumbing before cutting |
| Rigid galvanized duct | 4-inch diameter, 24-gauge | Buy in 2-foot sections for flexibility; have one section longer than your wall thickness |
| Metallic foil tape | HVAC-rated, 2 inches wide | For all duct joints — not standard duct tape |
| Vapor barrier repair tape or caulk | Butyl or acoustic sealant | For sealing the penetration through the house wrap/vapor barrier |
| Fire-stop caulk | UL-listed intumescent, e.g., 3M Fire Barrier 2000+ | Required at penetration of fire-rated assemblies — technically most exterior walls qualify |
| Termination cap | 4-inch, no screen, gravity damper | Match the siding material — flanged caps for vinyl/fiber cement; Z-flashed for lap siding |
| Exterior caulk | Paintable silicone or urethane | For sealing around cap flange against weather infiltration |
Step-by-Step Installation
Locate the target stud bay from inside
Use a stud finder to locate the studs on either side of your planned penetration. The hole must land between studs — not through one. Confirm there is no wiring or plumbing in the stud bay using the stud finder's wiring-detection mode and by checking against the home's electrical panel layout. Mark the center of the planned hole on the interior wall surface.
Drill a pilot hole from inside to outside
Using a long 3/8-inch drill bit, drill a pilot hole at the center of your marked location, angling very slightly downward toward the exterior (3–5° pitch). This slight downward pitch ensures any condensation that forms inside the duct drains toward the exterior rather than back toward the dryer. The pilot hole lets you verify the exterior exit location before committing to the full hole.
Cut the full hole from outside in
Go outside and use the pilot hole to center the 4-3/8-inch hole saw. Cutting from outside in produces a cleaner face on the exterior siding — which is the most visible surface. Cut through siding, sheathing, and any insulation blocking material. Stop before breaking through the interior drywall — finish that last 1/4 inch with a utility knife from inside to prevent tearing the drywall paper face.
Seal the vapor barrier / house wrap
Before inserting the duct, seal the penetration through the house wrap or vapor barrier. The standard method: apply a bead of butyl sealant or acoustic sealant around the hole in the sheathing, then press the house wrap back into contact. Some installers use a purpose-built penetration boot that integrates with the house wrap system. The goal is preventing bulk water infiltration around the duct at the sheathing plane — this is the layer where exterior moisture is meant to be stopped.
Insert the wall duct section
Cut a section of 4-inch rigid galvanized duct to the wall thickness plus 1–1.5 inches — it should protrude slightly past the exterior siding face to give the cap flange a surface to mount against. Insert this section through the hole. It should fit with about 3/16-inch clearance all around inside the hole — enough to apply fire-stop sealant but not so loose that it needs heavy packing.
Apply fire-stop sealant
Apply UL-listed intumescent fire-stop caulk (such as 3M Fire Barrier 2000+) to fill the annular gap between the duct and the hole at both the interior and exterior faces. Tool it smooth with a wet finger. Allow to cure per the manufacturer's instructions — typically 24–48 hours for full cure, though it skins over within an hour. This material expands in fire, sealing the penetration and preventing flame spread through the wall assembly.
Install the exterior termination cap
Slide the cap's collar over the protruding duct section. Most vinyl-siding-compatible caps have a nailing flange — cut an H-shaped notch in the siding to tuck the flange under the siding courses above. For other siding types, apply a bead of exterior silicone around the full perimeter of the cap flange before pressing it to the siding surface, then secure with appropriate fasteners (screws into the sheathing, not just the siding). Confirm the damper swings freely and closes fully under gravity.
Connect and seal the interior duct run
Connect the interior duct sections to the wall stub-out using slip couplers or crimped male/female duct end connections. Seal every joint with metallic foil tape — two full wraps around each joint. Support horizontal runs every 4 feet maximum. Connect the transition flex duct from the wall stub-out to the dryer exhaust outlet. Seal the flex-to-stub-out connection with metallic foil tape.
Test before finishing
Plug in (or restore gas to) the dryer and run a load. Go outside: confirm the cap opens fully, feel for strong warm airflow, and check for any air leaks around the cap flange. Come back inside and check that no air is escaping around the duct joints or the wall stub-out. If all checks pass, the installation is complete. Note the date and duct configuration for your maintenance records.
Common Mistakes and How to Avoid Them
| Mistake | Consequence | Prevention |
|---|---|---|
| No pitch toward exterior | Condensate drains back toward dryer; moisture damage to flooring | Aim pilot hole 3–5° downward toward exterior |
| No fire-stop sealant | Code violation; fire can spread through wall penetration | UL-listed intumescent caulk at both faces, always |
| Hole in siding cut too large | Cap flange can't bridge the gap; water infiltration | 4-3/8 inch is correct for 4-inch duct; cut precisely |
| Cap flange not caulked to siding | Water infiltration behind siding; rot and mold | Full bead of exterior silicone before pressing flange |
| Using gray fabric duct tape on joints | Tape fails within 6–18 months; joints open; lint leaks | Metallic foil tape only — 2 full wraps per joint |
| Sheet-metal screws inside duct | Screw tips catch lint; blockage builds from each screw | Never put screws inside the duct airstream; foil tape externally |
After Installation: Two Checks at Every Season Change
Exterior caps can accumulate lint, sustain weather damage, or have the damper seized by a wasp nest between annual cleanings. Walk outside twice a year — spring and fall — and visually inspect the cap. The damper should be fully closed when the dryer is off. Run the dryer briefly and confirm the cap opens. If either condition fails, address it before the next heavy-use season. Download the Maintenance Checklist PDF which includes this seasonal inspection as a printable checklist.
Exterior Wall Installation FAQ
Permit requirements vary by jurisdiction. Many jurisdictions do not require a permit for dryer vent work that doesn't affect structural elements. Some jurisdictions require a mechanical permit for any new exterior penetration. The 5-minute call to your local building department is worth making before you start — a stop-work order after the fact is far more disruptive than a permit obtained beforehand.
No — corner assemblies typically have structural doubles or triples that cannot be penetrated. Route around the corner to find a single-stud bay. This usually adds one 45° elbow, which costs 2.5 equivalent feet. Factor this into your equivalent length calculation using the calculator before committing to the path.
Brick veneer over wood framing is a two-layer penetration: first cut through the wood framing and sheathing as described above, then core through the brick veneer with a rotary hammer and diamond core bit. The brick core requires the same fire-stop treatment as a full masonry wall penetration. See Through a Brick Wall for the masonry portion of the procedure.
Wasps enter through any gap in the damper seal when the dryer is off. The best solution is a spring-loaded damper cap that maintains a positive seal when closed, rather than a gravity damper that may have a small gap. Commercial wasp deterrent sprays applied annually around the cap exterior can also help. Never add a screen — that creates a lint fire hazard. See Cap Selection Guide for pest-resistant compliant options.